
Apologies for not putting up a new post in a long time. We lost a family member recently and I’ve just not really had enough time to put things together for a design post. However, I’m back and here to give you a new “how-to” trick that has made my life a hell of a lot easier.
If the world of shirt shops only came with one color of shirt, white, life would be dull but a lot simpler. The fact that there are so many different colors and styles leaves me with the problem of catering to varied tastes when it comes to my designs. I tend to do a main design with some color to it and then an all white version for the darker colored materials. But when you try to just convert your image over to a white only ink you end up with a negative image instead of the more preferred style of using the negative space as an outline around white fill.
But, I did some digging around the net and found a plugin for Paint.Net that can make things easier. This is a multi step process but you can plan ahead to maximize turn around on your designs from color to all white.
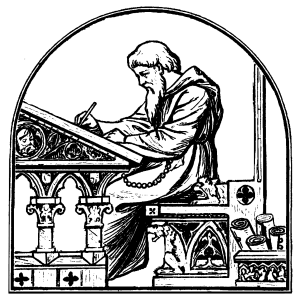
Let’s take a look at a black and white image I used for a recent design.
Step One
This image has a lot of intricate lines that and a lot of white that I want to either get rid of or change to a different color. First let’s get rid of the white and make it transparent. Before I found a plugin I had to use the magic wand and lasso every single bit of white coloring and cut it manually. This could take hours depending on how many individual pixels are in a color you want removed. Now, I can do it in just a couple of minutes.
Step Two
I downloaded a plugin which you can find here. Place the .dll file in your "\Paint.NET\Effects" folder. Now you can find it listed under the EFFECTS tab when you open Paint.NET.
Step Three
All you need to do is set your primary color as the one you want to remove. In this case I want the white removed. I click on EFFECTS and choose the plugin and voila. The white is now removed.
You can see the checkered background of the empty canvas that represents transparency. Then all I have to do is click on ADJUSTMENTS / COLOR BALANCE and I can make the design any color I want with a transparent background just by moving the sliders around.
Now, I will caution you that I prefer to start with a black and white image and then recolor it to my own tastes. The color stripper will remove that primary color from the design and any other color that is mixed with it. You could end up with a diminished look from losing a particular color from the mix. This is simply a way for me to remove white so I can add other colors to my designs or make one for darker shirts.
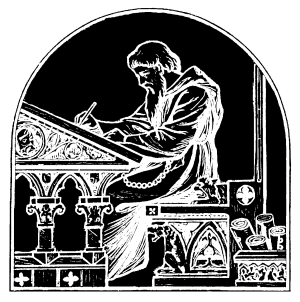
Let’s continue with making this a design for darker shirts. So we have this outline of a monk writing in a very ornate setting and in the case of darker shirts we want all of the dark lines to disappear leaving only the white spaces filled in with color. This allows the color of the shirt to be the outlines, using the negative space to fill in design. The same plugin can do this as well.
Step One
Change your design to a negative image. Choose ADJUSTMENTS / INVERTED COLORS to switch the black and white colors in your design.
Step Two
Make sure White is your primary color and choose the plugin under EFFECTS / STRIP PRIMARY COLOR to remove all the white from your design.
Step Three
Change your design back to a positive image by choosing ADJUSTMENTS / INVERTED COLORS.
Step Four
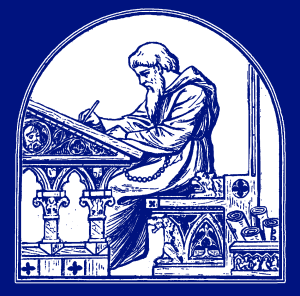
Now you can check out how your design will look on different dark colored shirts by adding a layer to your design. After you’ve added the layer, make it the lowest level of your design. Then choose any color from the color picker and use the paint can to do a fill. You can keep picking different colors and seeing the possibilities.
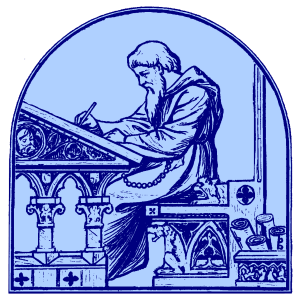
As a bonus, let’s show how I finished off the design for light colored shirts using a monochromatic style of coloring. Remember the first image of the black outlines with transparent background? Let’s change it to a two tone blue style of image.
Step One
While on the layer of your outlined image, choose ADJUSTMENTS / COLOR BALANCE. With the sliders I can adjust the color of the outlines to however I choose. I chose to make it a darker blue so that it will show up better on light colored shirts.
Step Two
Add a layer and then switch the empty one to the bottom of the stack.
Step Three
Chose White as a color and then use the paint can to fill in the empty layer making it a completely white background.
Step Four
Switch back to your top layer and use the magic wand to lasso everything outside of the image. NOTE: This only works if you have solid lines surrounding your image or enclosed spaces. Open lines may cause you to have a different effect than desired. Since this image is entirely enclosed within that arched outline it is simple to do this.
Step Five
Switch back to your bottom layer with the magic wand still lassoing the space outside your design.
Step Six
Cut the lassoed area out (Ctrl+X) leaving it transparent. This will give you back the white background you had when you started but on a different layer allowing you to manipulate the color without changing the color you already established for your main image.
Step Seven
I have found with Paint.Net that when I manipulate something in either the EFFECTS menu or the ADJUSTMENTS menu the type of change will duplicate the last one used if I choose it again. In fact the EFFECTS menu gives you the option of repeating the last effect you chose. So, by choosing ADJUST / COLOR BALANCE the same settings you established for the darker top layer will be applied to the lighter lower layer, giving you a lighter shade of blue.
Step Eight
Add your text and voila. Below is my finished product.

It feels good to be back. Peace out!

Post a Comment